A product can be beautifully made, carefully styled and ready for its close-up. But once the lights are on and the camera is set, small details can make a surprising difference. A harsh reflection, an uneven background or a surface that does not quite suit the product can change the entire look of a photograph.
That is where acrylic comes in.
Used in all sorts of studio setups, acrylic helps photographers shape light, create clean backgrounds and position products exactly where they need them. It can be used as a light diffuser, a shooting surface, a backdrop or even a discreet prop that makes a product appear to float.
The type of acrylic you choose depends on the effect you want to achieve. Here is a closer look at how different finishes and shapes can help in a professional photography studio.
Why do photographers use acrylic?
Acrylic is a practical material for photography because it is lightweight, rigid and can be made into a wide range of shapes and sizes. It can be cut, drilled, routed, bonded and formed to suit different studio requirements.
Clear cast acrylic also offers excellent light transmission. At 3 mm thickness, manufacturer data indicates light transmission of more than 92%. This makes it useful where light needs to pass through a surface rather than simply reflect off it.
For photographers, the appeal is its versatility. One material can serve several purposes, from diffusing light behind a product to creating a reflective surface beneath it.
Creating softer light with opal acrylic
Anyone who has photographed a glossy product knows how easily a light source can become a distracting hotspot. The aim is often to keep the product well lit without making the reflections too harsh.
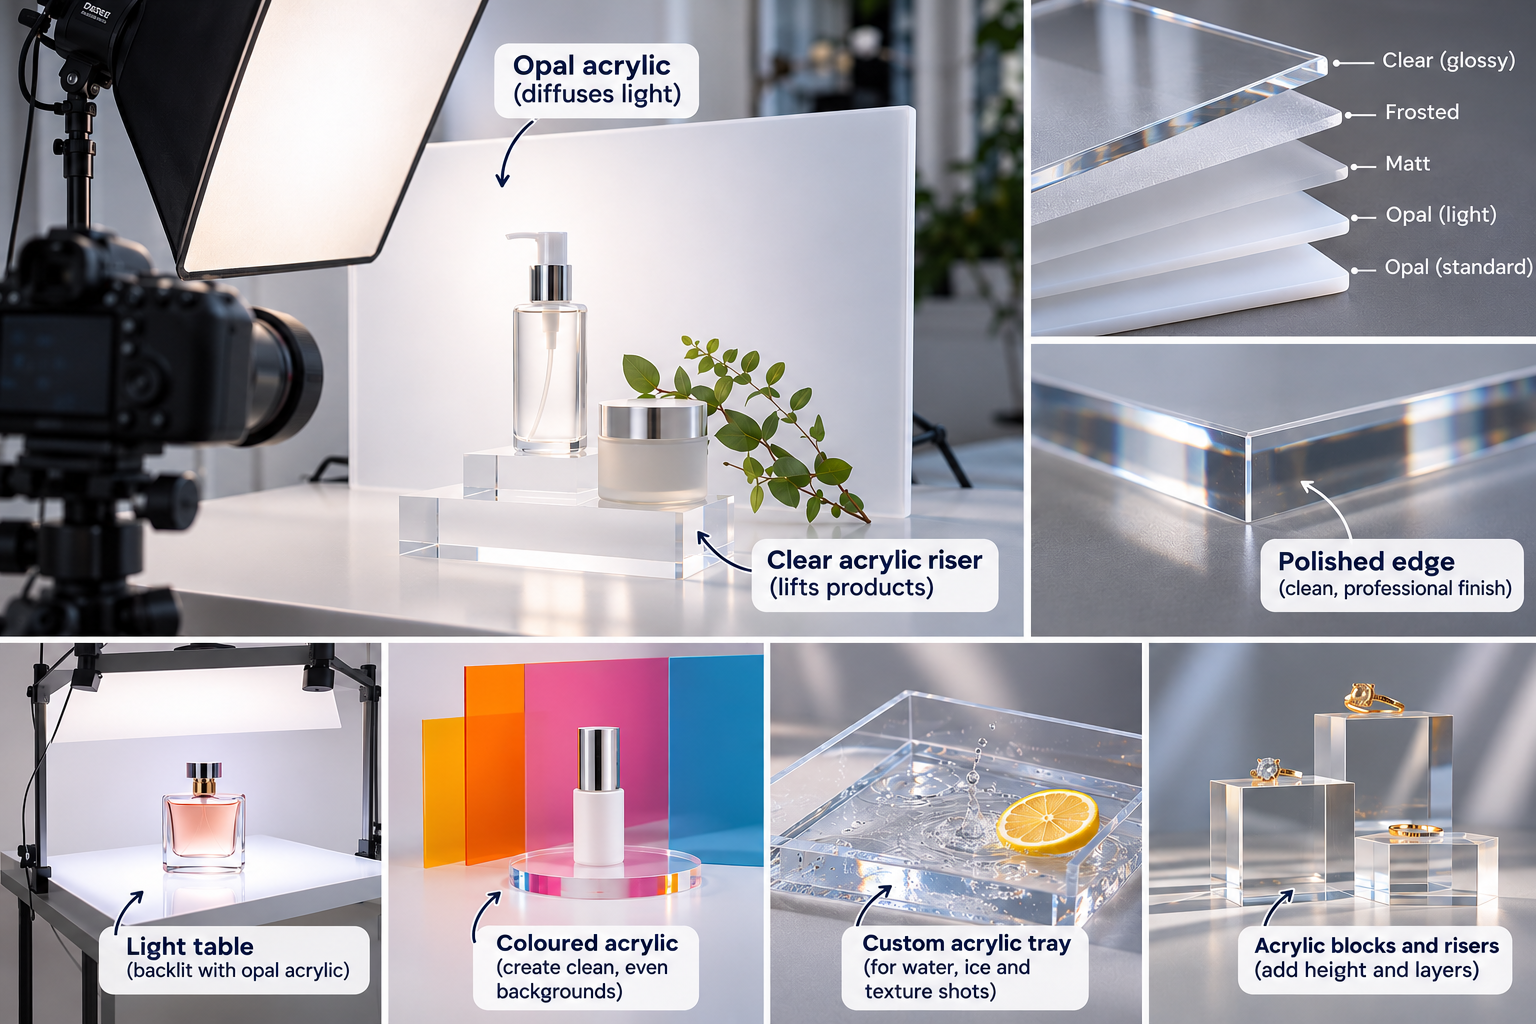
Opal acrylic helps achieve this by scattering light as it passes through the sheet. Place an LED panel or flash behind it, and the concentrated light source becomes a broader, softer glow. This can help create more even lighting and gentler shadows.
In a studio, opal acrylic can be used for:
- Light diffusion panels positioned between the light source and the subject.
- Light tables for photographing objects from above or below.
- Backlit surfaces for products such as glassware, jewellery and cosmetics.
- Custom light boxes made to suit a particular product or shooting setup.
The density of the sheet affects the result. A denser opal finish provides stronger diffusion, while a lighter opal allows more light to pass through. The right choice depends on the brightness of the lighting equipment and the effect the photographer wants.
Sheet thickness also matters, particularly when the panel needs to span a larger area without losing its shape.
Using frosted, matt and coloured acrylic for backgrounds
Not every photograph needs a bright, backlit surface. Sometimes the goal is to create a quieter background that lets the product do the talking.
Frosted and matt acrylic can help with this. Their surface finishes break up reflections, making them useful when a photographer wants to reduce distracting glare while retaining some depth and direction in the lighting.
A frosted sheet can create a soft, slightly translucent surface beneath skincare products, homewares or technology. Coloured acrylic offers another option, providing a consistent background tone without the folds, creases or wear that can develop on paper backdrops.
These finishes give photographers more control over the overall look of a shoot. Rather than changing the entire studio setup, they can change the surface to suit the product, colour palette or visual direction.
Why clear acrylic blocks and risers are useful
Look closely at some product photographs and you may notice that the product is not sitting directly on the surface. It has been raised slightly, positioned at an angle or placed at a different height from the objects around it.
Clear acrylic blocks and risers make this possible without drawing too much attention to the support itself.
They are commonly used to:
- Raise products to the desired height.
- Create different levels in a product arrangement.
- Position jewellery, watches and fragrance for close-up photography.
- Give products the appearance of floating.
- Add subtle reflections and light effects around the subject.
Because clear acrylic allows light to pass through, it can be less visually distracting than a solid support. However, the finish is important. Scratches, rough edges and fingerprints can become very noticeable under studio lighting, particularly in close-up shots.
Keeping the protective film on until the prop is ready to use, and cleaning it with a suitable acrylic cleaner and soft cloth, can help keep the surface looking its best.
When a standard prop is not quite the right fit
Photography setups are rarely identical. A tray that works for one product range may be too small for another. A standard riser may not provide the right height, and a ready-made panel may not fit an existing light box.
This is where custom acrylic fabrication can be useful.
For example, a clear acrylic styling tray can be made to hold water, ice, sand or other materials used to create reflections and textures in a product photograph. Its dimensions can be planned around the product and the camera framing, rather than the photographer having to work around an off-the-shelf size.
There are a few things worth considering before making one:
Size and depth: Think about the largest product you intend to photograph and how much room you need around it.
Sheet thickness: The sheet needs to suit the size of the tray and what it will hold. Water adds weight, so the material and construction need to be considered carefully.
Joints and edges: Clean bonding and well-finished edges matter, especially when the prop will be visible in close-up photographs.
Colour and finish: Clear acrylic is a versatile starting point, but a tinted or coloured finish may work better for a particular visual style.
The same approach can be used for custom risers, display stands, platforms, tiles and other studio props.
Choosing acrylic for your photography setup
Before ordering acrylic, it helps to think about how it will be used rather than choosing a sheet based on appearance alone.
A diffuser needs to work with the lighting equipment. A shooting surface needs to suit the size and weight of the product. A clear prop needs a finish that will look clean under close-up lighting.
When requesting a quote, it is useful to provide:
- The type and approximate size of the products you photograph.
- The purpose of the acrylic, such as diffusion, a backdrop or a display prop.
- The lighting equipment and its distance from the sheet.
- The required dimensions and preferred finish.
- Any cut-outs, curves, fixing points or other details.
- A sketch, photograph or drawing if you have one.
As plastic fabrication company, we work with acrylic from our Henderson workshop in Auckland. Depending on the project, we can cut panels to size, CNC route and laser cut shapes, thermoform curved components, and fabricate bonded blocks, plinths, risers and light boxes. We can also 3D print brackets and clips to suit existing equipment.
Whether you need a straightforward replacement panel or a custom piece for a particular photography setup, the best place to start is with the dimensions and a clear idea of what you want the finished piece to do.
What type of acrylic is best for product photography?
It depends on the purpose. Opal acrylic is useful for diffusing light, frosted or matt acrylic can help control reflections, and clear acrylic is commonly used for risers, blocks and reflective styling props.
Is acrylic suitable for a photography light table?
Yes. Acrylic is lightweight and can be cut to suit a particular light table or studio setup. The sheet type and thickness should be selected according to the size of the panel and the lighting arrangement.
Can acrylic be used with LED lighting?
Yes. LED panels are commonly used with acrylic diffusion panels. However, acrylic should be kept away from hot continuous light sources. Cast acrylic manufacturer data gives a service temperature range of approximately -40°C to 80°C, so it is worth checking the temperature of the setup.
Can acrylic be cut to fit an existing light box?
Yes. Acrylic panels can be cut to suit an existing light box. Provide the internal measurements, the required thickness and, if possible, a photograph or drawing of the current setup.
How should acrylic photography props be cleaned?
Use a soft cloth and a cleaner suitable for acrylic. Avoid abrasive materials and household cleaners that are not compatible with the surface, as they can cause scratching or surface damage.
A better fit for the way you work
Good product photography is often about getting the small details right. The right acrylic sheet, finish or custom-made prop can make a studio setup easier to work with and give the photographer more control over the final image.
If you have an idea for an acrylic diffuser, backdrop, riser or styling prop, send us your measurements, sketch or photograph. We can discuss the material and fabrication options and help you work out what is suitable for your setup. If you need any props for your photography for accessories, our sister company could cater your needs.